

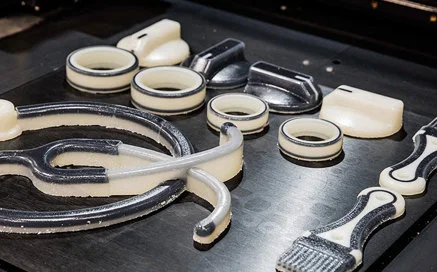

Create Unique, Complex Geometries with Overmoulds by Leveraging PolyJet 3D Printing
What is an Overmould?
What do you do when you need a part made from two or more materials at the same time? Most commonly, these parts have a rigid section and a flexible section. The rigid section is called the substrate and the flexible section is called the overmould. A common example of an overmoulded part is your toothbrush! The white, rigid part is the substrate, and the blue, flexible part is the overmould.
🔗 Related: Overmoulding Guide → /services/injection-molding/overmolding/
Why PolyJet?
PolyJet is the only 3D printing technology we offer that can produce prototypes of overmoulded parts. PolyJet works by dividing the part into voxels, or 3D pixels. It then assigns a material and durometer to each voxel. The machine is loaded with both rigid and flexible material. As the print head moves across the bed, it deposits droplets of material. For 30 Shore A parts, it deposits only flexible resin; for rigid parts, it deposits only rigid resin. For any hardness, or durometer, in between, the print head deposits a mixture of flexible and rigid droplets in a ratio appropriate to the desired hardness.
Because the PolyJet machine can pick and choose what material it deposits where, it is uniquely able to use multiple durometers and colours on the same part. Most commonly, this takes the form of a rigid substrate with a flexible overmould, but it could also be two flexible materials or two rigid materials.
🔗 Related: 3D Printing services
Material Options
Below are the material options for PolyJet. The three available colours are black, white, and clear. For each material there is a range of durometers, or hardness. All materials fall under the Shore A hardness scale and range from 30 to 95. The durometer scale isn't hard to figure out: the higher the number, the more rigid the material.
Colour
Durometer
Black, White, Clear
30A, 40A, 50A, 60A, 70A, 85A, 95A, Rigid
Note: The softest durometer available for White is 50A.
When choosing colour and durometer, there are some limitations on what combinations we can build. The table below shows the available combinations. Each row represents an available machine configuration. For example, a part featuring a Rigid White body with 50A Black buttons would utilise Option 4. However, you would not be able to select a Rigid Black body with 50A White buttons because we don't have a machine set up with Rigid Black and Flex White. If you have accidentally chosen a configuration we are not able to accommodate, we will let you know and allow you to choose an alternative before we start building anything.
Option
Configuration
Option 1
Rigid White, Rigid Clear, Flex Clear, Flex White
Option 2
Rigid Black, Rigid Clear, Flex Clear
Option 3
Rigid Clear, Rigid Black, Flex Black
Option 4
Rigid White, Rigid Black, Flex Black
🔗 Related: 3D Printing Materials → /materials/3d-printing/
Configuring Your PolyJet Overmould Quote: Set Up the CAD Model
PolyJet overmould quote requests are a bit different than quoting for any other type of 3D printing. First, we need a .STEP or .STP file of the assembly. In that file, the substrate and the overmould must each have their own solid body. This way, the machine will know what material goes where. Each solid body will be assigned a colour and durometer – more on that later.
We also require that the file represent the part as you would like it to be printed. The parts must be positioned correctly in the assembly – if the buttons are separate from the main housing, that is how they will be printed.
Finally, we also want the various bodies to mate line‑on‑line. This means there is no gap between the two bodies. If there is a gap, the machine will try to put support matrix between the two bodies. Since the support matrix is designed to be removed, its inclusion makes it easier for the two bodies to separate once the part has built. We also do not want the bodies to overlap. If the bodies overlap, the machine will try to draw twice in the same area which can cause the build to crash.
🔗 Related: Design for Manufacturing Toolkit → /resources/design-for-machining-toolkit/
Configuring Your PolyJet Overmould Quote: Set Up the Quote
Now that you have got your file ready, it is time to upload! Once the file has been uploaded, select "Digital OverMould" from the material drop down.
In addition to material selection, we will also need to know the colour and durometer for each body in the file. Use the Special Instructions area to provide this information. If you have a formal drawing, that is great, but even a simple screenshot with arrows will work for us. We prefer a visual indication of colour and durometer because it minimises the opportunity for miscommunication – a picture speaks a thousand words.
Lastly, submit your quote for review by clicking the "Request for Quote" button. This sends the quote to our team for review. We will review the requested material combination and analyse the parts for any other build concerns. Once we are done, you will get an email notifying you that your quote is complete.